
The first time you open a cross stitch chart, it can look like a page of tiny code. It is much simpler than it looks. Every chart is built from the same few parts, and once you know them you can pick up any pattern, from a bookmark to a big sampler, and know exactly where your needle goes.
The short version
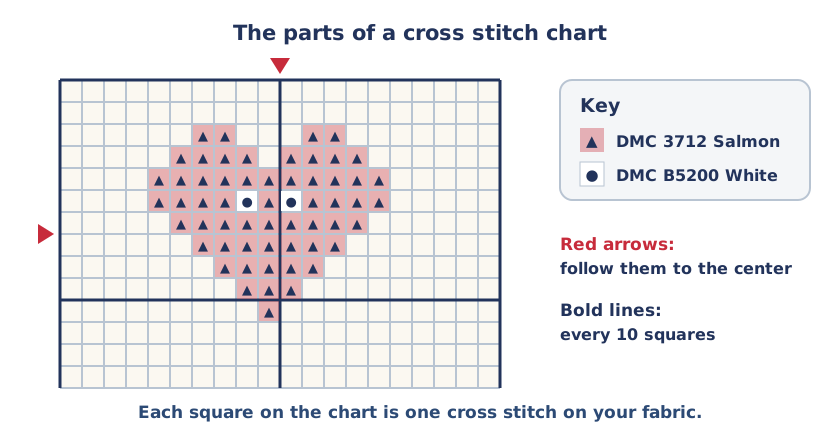
A cross stitch pattern is a grid. Each square on the grid is one cross stitch on your fabric. A symbol or color in a square tells you which thread to use, and the key tells you which thread each symbol stands for. Empty squares are left unstitched. You find the middle of the chart and the middle of your fabric, and start there.
The four parts of every pattern
1. The grid
The chart is drawn on squared paper. Every tenth line is thicker, which splits the chart into blocks of 10 × 10. Those bold lines are there to help you count. If a shape is 23 squares wide, you count two blocks and three more instead of counting 23 single squares.
2. The symbols
Each thread color has its own symbol: a dot, a triangle, a letter, a heart. Some patterns print the symbols on colored squares, some are black and white, and some show only color. Black and white charts are easier to read when you print at home, and they still work perfectly.
3. The key
The key (sometimes called the legend) is a list of every symbol with its thread. A typical line reads: ▲ DMC 3712 Salmon, 2 strands. Most patterns use DMC numbers. If you want to see a color before buying, look it up in our DMC floss color chart.
4. The notes
Near the key you will usually find the design size in stitches (for example 70 × 50), a suggested fabric and how many strands to use. The design size tells you how big the finished piece will be. Our cross stitch calculator turns it into inches for any fabric.
Where to start: the center
Most stitchers start in the middle of the design. That way the picture ends up centered on the fabric, with the same space on every side for framing.
- On the chart: look for the small arrows halfway along the top edge and halfway down the side. Follow them in with a ruler or your finger. Where the two lines meet is the center square. Mark it lightly with a pencil.
- On the fabric: fold it in half, then in half again the other way, and pinch the corner. The point where the folds cross is the center.
- Count to your first stitch. The center square is often empty. Find the nearest symbol, count how many squares up or down and left or right it is, and count the same on your fabric.
After the first stitch, you always count from stitches you have already made. That is far easier than counting across bare fabric.
Reading the special marks
| On the chart | What it means |
|---|---|
| A symbol filling a whole square | A full cross stitch |
| A colored line along the edges of squares | Backstitch, usually stitched last with one strand |
| Only one triangle of a square filled | A three-quarter stitch |
| A small symbol in one corner | A quarter stitch |
| A dot or small circle, often where lines cross | A French knot |
| Gray or shaded rows at a page edge | Overlap rows repeated from the next page |
Not sure how to stitch the special ones? We have guides on three-quarter and other fractional stitches and on backstitch and French knots.
Charts on more than one page
Bigger patterns are split across several pages. Somewhere near the start there is usually a small page map, a thumbnail of the whole design divided into numbered pieces. Use it like a road map.
Many designers repeat two or three rows at the edges of each page, shaded gray. Those rows also appear on the next page. Stitch them once, then use them to line up the next page. If your pattern has no overlap, count carefully from the bold lines as you move between pages.
How to never lose your place
- Highlight as you go. Print a working copy and color over each area once it is stitched. The original stays clean for next time.
- Stitch one block at a time. Finish a 10 × 10 area in one color, then the other colors in the same block. It is easy to check your counting against the bold lines.
- Use a tablet. Our free Stitch Tracker opens our patterns on an iPad, phone or computer: pick one color, everything else fades, and you tap stitches as you finish them. On Android, the Pattern Keeper app does something similar with many PDF patterns.
- Grid your fabric for big projects. Run a removable thread along every tenth line so your fabric has the same bold lines as the chart.
Common mistakes when reading a chart
- Counting holes instead of squares. Count the squares of fabric (or the blocks of Aida), not the holes between them.
- Mixing up look-alike symbols. ● and ○ or ▲ and △ are easy to confuse in small print. Mark the pairs in the key with two different highlighters before you start.
- Starting at a corner. It works if you measure very carefully, but starting at the center is much more forgiving.
🎓 Want to practice with a chart made for learning? Stitch Club members get a step by step lesson, a practice pattern and the Chart Reader badge. See Week 3 of Cross Stitch School
Frequently asked questions
What do the symbols on a cross stitch pattern mean?
Each symbol stands for one thread color. The key next to the chart lists every symbol with its thread, usually as a DMC number and name.
Where do you start a cross stitch pattern?
Most people start at the center. Follow the arrows on the edges of the chart to find the center square, and fold your fabric in half both ways to find its center.
Why are some lines on the chart thicker?
Every tenth line is bold so you can count in blocks of ten. It makes counting large areas quick and accurate.
What do empty squares on a chart mean?
Leave them unstitched. The fabric shows through there, or another stitch such as backstitch covers that area.