
Finishing in a hoop is the quickest way to get a piece on the wall. It takes under an hour, costs very little, and suits small and medium designs beautifully. Done well, the back looks as neat as the front, which matters when it is a gift.
What you need
- Your finished piece, washed and pressed (see how to wash cross stitch)
- A wooden or bamboo hoop in the right size
- Sharp fabric scissors
- A sewing needle and strong thread
- Optional: felt for the back, fabric glue, ribbon for hanging
Choosing the right hoop
Pick a hoop that leaves a border of about half an inch to an inch (1 to 2.5 cm) around the design on every side. Too tight looks cramped; too loose and the design floats. Hoops of 4, 5, 6 and 8 inches are easy to find.
For display, use a good round hoop. One that you have stitched with for months may be slightly bent out of shape.
Step by step
- Center the design. Turn the hoop so the screw is at the top: it becomes the hanger. Lay the fabric over the inner ring, press the outer ring on top and check from the front that the design sits in the middle and the rows of stitches run straight.
- Tighten and smooth. Tighten the screw a little, gently pull the fabric taut all around, then tighten fully. The fabric should be smooth like a drum.
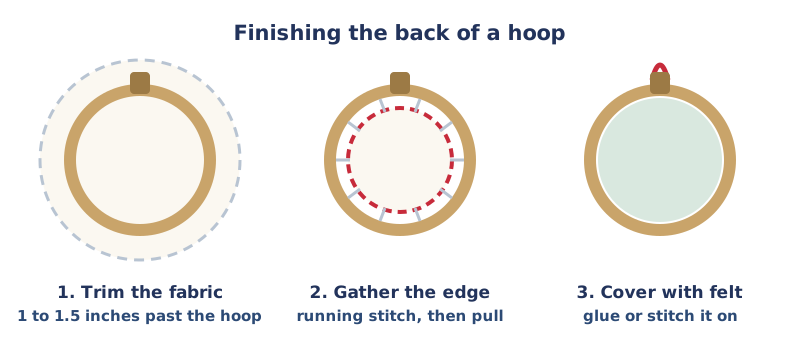
- Trim. Turn the hoop over and cut the fabric in a circle about 1 to 1.5 inches (2.5 to 4 cm) beyond the hoop.
- Gather. With strong thread, sew a loose running stitch around the fabric about half an inch (1 cm) from the edge. Pull the thread so the fabric gathers in behind the inner ring, and tie it off firmly.
- Cover the back. Cut a felt circle to fit inside the hoop and glue or stitch it over the gathered fabric.
- Hang it. Tie a ribbon through the screw at the top.
Tips for a professional look
- Add a second layer. On white or pale fabric, the threads at the back can show through. Put a piece of plain white cotton behind your work and hoop both layers together.
- Stop slipping. Wrap the inner ring with cotton bias tape or twill tape first. It grips the fabric and keeps it tight for years.
- Paint or stain the outer ring before you start, to match a room or a season.
- No glue? Whip-stitch the felt to the gathered fabric instead.
Gift touches
Write the date and the name of the person it is for on the felt back, with a short care note: dust gently and keep out of strong sun. Small hoops of about 3 inches make lovely ornaments; finish them the same way and tie on a loop of ribbon.
Hoop or frame?
A hoop is quick, light and informal. A frame with glass protects the piece from dust and suits larger or more formal designs. For something you want to keep for decades, a frame is the safer choice; for gifts and seasonal pieces, a hoop is hard to beat.
🎓 Stitch Club members finish their own practice piece in a hoop and earn the Hoop Finisher badge. See Week 8 of Cross Stitch School
Frequently asked questions
What size hoop should I use to display cross stitch?
One that leaves about half an inch to an inch of fabric around the design on each side.
How do you finish the back of an embroidery hoop?
Trim the fabric to about 1 to 1.5 inches past the hoop, gather it with a running stitch, then cover it with a felt circle.
Can I use the same hoop I stitched with?
You can, but a hoop used for months may be slightly bent. A fresh hoop looks neater on the wall.
Do I need glue to finish a hoop?
No. You can stitch the felt to the gathered fabric instead of gluing it.