
This is the week you make your first real cross stitches. You will learn how to prepare your thread, start without a knot, make a neat X, stitch in rows and finish your thread tidily. Take it slowly: neat beats fast.
Step 1: Cut and separate your floss
Cut a length of floss about 18-20 inches (45-50 cm), roughly from your fingertips to your elbow. Longer threads tangle and wear thin.
Floss has six strands. Hold the top of the length, pull one strand straight up and out, and let the rest bunch up below; it will untangle as the strand comes free. Repeat for as many strands as you need. On 14-count Aida you stitch with two strands. (Not sure for other fabrics? See how many strands for cross stitch.)
Step 2: Start without a knot (the loop start)
Knots make lumps under your finished piece and can pull through the fabric, so cross stitchers avoid them. When you stitch with two strands, the loop start is the neatest way to begin:
- Take one strand twice as long as usual (about 36 inches or 90 cm) and fold it in half.
- Thread the two cut ends through the needle, so a loop hangs at the other end. You now have two strands to stitch with.
- Bring the needle up from the back at your first stitch, leaving the loop hanging at the back.
- Make the first half of your stitch: go down at the opposite corner of the square (Step 3 below shows the corners).
- At the back, pass the needle through the loop and pull gently. The thread is now locked in place, with no knot.
Stitching with an odd number of strands? Use a tail start instead: come up from the back, leave a 1-inch (2.5 cm) tail behind the fabric, hold it flat along the path of your next stitches, and cover it with your first four or five stitches.
Step 3: Make the X
Each cross stitch covers one square of Aida and uses its four corner holes.
- Come up at the bottom-left hole of the square.
- Go down at the top-right hole. That is the bottom (first) leg:
/ - Come up at the bottom-right hole.
- Go down at the top-left hole. That is the top (second) leg:
\, and your X is done.
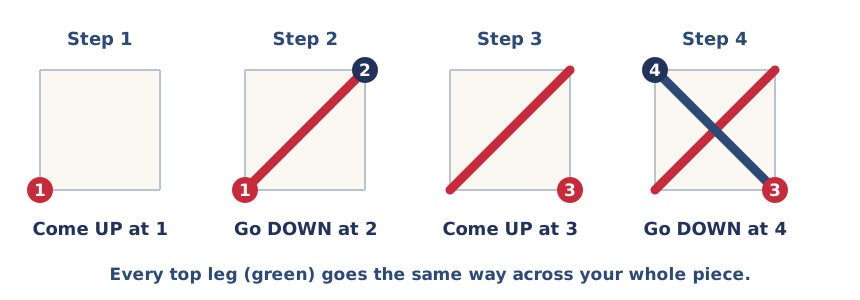
The golden rule: all top legs must lie in the same direction across the whole piece. It does not matter which direction you choose, but keeping it the same is what makes cross stitch look smooth and professional.
Step 4: Stitch in rows (two methods)
- English method (one at a time): finish each X completely before moving to the next. Best for single stitches, scattered colors and diagonal lines.
- Danish method (row by row): stitch a whole row of
/first, then come back along the row making the\legs. Faster and very even for large areas of one color.
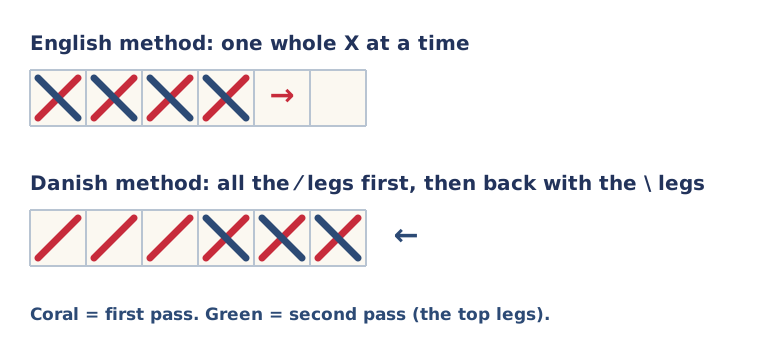
Try both this week. Most stitchers end up mixing them: Danish for big blocks, English for details.
Step 5: Get the tension right
Pull each stitch until it lies flat on the fabric, and no tighter. Stitches pulled too hard make the holes bigger and pucker the fabric; loose stitches look loopy. If your thread starts to twist, let the needle hang down for a moment and it will untwist by itself.
Step 6: Finish your thread
When about 3 inches (8 cm) of thread is left, take the needle to the back and slide it under the backs of three or four nearby stitches of the same color (or similar). Pull through and snip the end close. No knot needed, and nothing will come undone.
Common first-week mistakes
- Top legs going different ways. Check every few stitches until it becomes a habit.
- Carrying thread a long way at the back. If the next stitch is more than about 3 squares away, finish the thread and start again, so the dark thread does not show through.
- Using too many strands. Six strands straight from the skein are far too thick for 14-count Aida.
- Miscounting. Count twice, stitch once. It is normal to unpick a few stitches while learning. To unpick, take the needle off the thread, then use the needle’s blunt tip to loosen the last leg and pull the thread back out, one leg at a time. Week 11 covers bigger fixes.
Watch: your first cross stitches
Video by: Caterpillar Cross Stitch
The video shows three ways to start, including a knot. We recommend the loop start or the tail start instead: knots make lumps under your finished piece.
Watch: the loop start
Video by: Fat Quarter Shop FlossTube
This week’s challenge
Week 2 challenge · Badge: Perfect X
Three practice rows and a tiny heart
- Stitch one row of 10 crosses with the English method.
- Stitch one row of 10 crosses with the Danish method.
- Stitch one row starting with the loop start and ending under your stitches.
- Stitch the tiny heart from the practice sheet, starting from the center of your fabric. Each square on the sheet is one cross stitch: X squares in DMC 3712, G squares in DMC 3363. The arrows on the edges point to the center square.
Check: do all your top legs point the same way?
📄 Practice sheet with the tiny heart (PDF) is free with an account. Create a free account
Quick answers
How do you start cross stitch without a knot?
Use the loop start: fold one long strand in half, thread the cut ends, make your first half stitch and pass the needle through the loop at the back. With an odd number of strands, hold a tail at the back and cover it with your first stitches.
Which way should cross stitches go?
Either way, as long as every top leg in the piece goes the same direction. Most people stitch the bottom leg / first and the top leg \ second.
How long should my thread be?
About 18-20 inches (45-50 cm). For the loop start, use one strand twice that length, folded in half.